December 31, 2012

Handmade for Newtown baby quilt

A week before Christmas, Rachael from Imagine Gnats sent out an email about Handmade for Newtown, a charitable online auction created in the wake of the tragedy in Newtown, Connecticut, the week before.  While I didn't know anyone even indirectly affected by the shooting (besides all American citizens, I guess) I did feel like this was possibly the most horrific tragedy since Columbine and wanted to get involved.  While you can read more about it here, the auction won't start for a couple weeks.  All profits from the auction will go to the Newtown Parent Connection, which will help families directly affected in that small town.

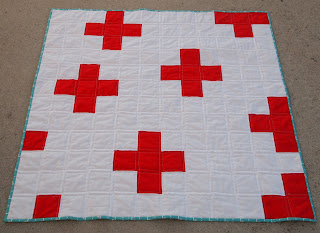
I felt I needed to help, and wanted to contribute something handmade, as opposed to supplies.  I designed a crib-sized quit (roughly 41" x 41") featuring an iconic symbol of help: a red cross.  


I love modern cross quilts as it is, and taking a cue from Plus quilts, where the crosses are made of different-colored squares instead of individual blocks, I drew out a random number of crosses on graph paper.  Once I decided the squares should be 4.5" unsewn, the rest was quite simple!


I sewed everything in strips, according to my original drawing.  There are 12 rows, with 12 squares in each row.

Taking shape on the floor of the sewing room.

I also knew I wanted to bind and back the quilt with Little Apples, Aneela Hoey's fall 2011 line featuring children and schoolyard scenes.  As strong as I felt toward using this fabric, I had a lot of reservations.  Would people see it as insensitive, showcasing small children?  Would it be inappropriate toward the victims?  I'm still wrestling with that.  I asked Nick and he felt strongly as well about using it; he thought it was appropriate, and more so, well-fitting, to use it as the backing.  Hopefully no one is offended!


I did bind this by hand, which I normally hate!  But I found it wasn't as difficult as I originally thought.  However, washi tape had to stand in as a thimble and joint support.  How do I not have a thimble?  Oh, because I really dislike hand sewing!


The cats also enjoyed me making this quilt.  I even got Nick to help baste it!!


Here are some details: I used Moda Bella Solids in red and white for the front, and Little Apples for the binding and backing, as I said.  The batting is 100% natural cotton and sewed up like a dream.  I bought it in October at Joann's when batting was BOGO and wish I had bought more!  I love it!

I just pulled the quilt from the dryer and am so impressed with how it crinkled up.  I really hope whoever buys it loves it.  I'll post more information on the Handmade for Newtown auction as it's released.

How was everyone's holiday?  It's almost 2013!  Do you have any goals for your quilts this year?  We can talk about that next week!

December 21, 2012

Friday Round-up

I'm hoping our dear readers are taking some time away from the internet.  But, just in case you aren't, here are two of my favourite Christmas* ads.


This is an oldie, but I do love cheese. 


This is last year's John Lewis ad.  I admit I shed a little tear.


*And for our readers not celebrating Christmas...a little something to brighten your seasonal break. 


This is another oldie, but I wet myself laughing every single time. 


December 19, 2012

Scrappy Squares

What to sew, what to sew?

To be honest, when we started this venture I didn't think beyond the t-shirt quilt.  I had been wanting to attempt it for so long and was so sure it would take me ages that I didn't think there was a need to think beyond the jersey adventure.

But then I was done.  What to do next?

I am planning a baby/cot quilt made out of Pete's old work shirts for our little one, but I'm not ready to attempt that just yet.  I want that one to follow a more traditional quilting pattern but, as the fabric might be a bit more dear or delicate, I'm not up for using it for experimentation.

Enter a remnant sale at my local fabric/upholstery shop.  Actually, it's more upholstery.  I came home with all kinds of remnants perfect for cushions or window treatments.

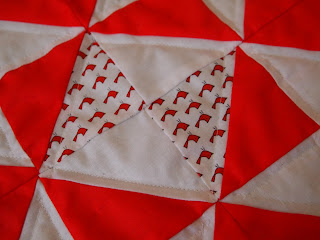
I specifically pulled a collection of very small remnants (actually the remains of a sample book) to experiment with some triangles.


Not the most alluring of colours or design.  After relieving each piece of its paper backing I started pairing them up purely on size.  Which squares were of similar size?  Then without much forethought, I ran the seams down the middle of the squares resulting in two squares made up of two triangles.


Well now what?

Because I didn't put a lot of pre-thought into the project I'm stuck trying to create some patterns out of a bit of colour chaos.  I'm thinking of making these into slipcovers for the pillows on our couch.  Pete won't be thrilled as he likes things simple but those cushions need a bit of liven up and I need to practice.  Of course this means I shall have to learn to sew either zippers or button holes.


Perhaps I could try to pass them off as seasonal decor.  If I arrange them just right perhaps I can create a 'Christmassy' look or 'spring renewal' pattern.


Let's not hold our breath.

December 17, 2012

Binding Plans

One of the benefits of not having plans for the holidays (besides working) is I have a lot of time for myself.  I'm not exchanging gifts with anyone this year, and we're only going to my parents' house next weekend, so money and time are a precious resource that can be spent selfishly.  Ordinarily, I'd feel bad about it, but losing November to a whirlwind of moving and starting fresh calls for some me time!

As a result, I've been crafting a lot, sewing clothes and accessories just for fun and not for anything or anyone.  But I agreed to take on a project this past week that would entail hand-binding a large quilt for a well-known quilter.  I'm not one to shy away from a challenge (ever...yeah, I'm nuts, I get it) and I figured I'd need to learn the skill at some point.  My machine binding isn't great, as evidenced.  While it's definitely getting better, I wouldn't feel comfortable giving anyone a quilt with these skills, and I'm even surprised my mom didn't say anything about the binding when I gave her my mini Modern Maples quilt.  I'm learning straight from the internet, and that isn't my favorite method.  Normally I like to be taught in person, so I can ask all the questions I want.

However, that isn't an option right now, so I'm back to blogs!

Do you have any recommendations for learning hand-binding?  I get the general gist but I need help with the details.  I've found these resources:

Those are just a few.  My mom hand sews binding occasionally, so I may consult with her as well.

These, and the 1,880,000 Google results, will help me get through this and complete this challenge.  I hope, anyway!  Plus, I have lots of quilts to finish in 2013.  I won't say much about those, but I do have New Year's Resolutions to talk about soon, and they involve all the quilt tops you've seen here this year.

What's your favorite method of binding?  Isn't that a weird question?  I love how crafters, sewists and quilters have their own language, and we all get it.  Also, if you want to fill me in on your holiday plans, I'd love to hear!

December 14, 2012

Friday Round-Up


Hey everyone!  I hope you've had a good week.  I'm still trying to figure out my new home and work life; it's bizarre to me that I only spend 15 minutes getting home now, instead of an hour, and I wake up an entire hour later than I have for the last two years.  I can sew at night!  And watch TV!  So strange.

Anyway, back to the matter at hand!  Here's what I found around the internet this week:

  • First off, big news!  The Land That Never Was by Lisa Congdon for Cloud9 was previewed today!  It's kind of Lizzy House "Castle Peeps" but much funkier.  The colors are amazing!
  • Amy Butler's Weekender bag is number one on my 2013 to-do list, and this post from Threadbias is making  me want to get a headstart!  The hardest part will be choosing fabric (she says naively).
  • I'd love to make some beeswax candles.  Even if I didn't burn them, they look great around the house!
  • I'm not a huge drink maker--even when I'm having alcohol, craft beer or a vodka tonic will do just fine--but these homemade Italian cream sodas look delicious.  
  • I kind of want to go to Joann's this weekend and buy some purse frames for these coin purses.  They're so cute and look pretty simple too--perfect for weekend sewing!
What have you been seeing lately?  Have a great weekend, everyone!

December 10, 2012

The Cardinal-Candy-Cane Tree Skirt

Remember back in September when I said I was done with Christmas projects, that I would now focus completely on year-round projects instead of seasonal?  I lied.  I have one last Christmas project today: a tree skirt!

I wanted to make one last year for our little apartment tree, but it never happened, probably because I didn't quilt at the time and really had no interest in learning it.  We were skirtless last year, which wasn't a huge deal, because we celebrated Christmas at our families' houses in Florida, so no presents even touched our floors.  I forgot about it until we moved here and got a real tree.  While we aren't exchanging gifts this year, it just looked incomplete to have a big tree, lots of lights, and shiny ornaments without a tree skirt.  Plus, any reason to buy fabric is a good reason, so I ordered more Santa Claus is Coming to Town by Creative Thursday and planned out what I'd do.

I had pinned a few tree skirts on Pinterest in the fall as I saw them, but they were more "inspiration" than "plans," as so many of my pins are.  (Do you follow us on Pinterest?  I'm here, and Ariel is here!)  When I decided to make a tree skirt, I went back through and chose this one, from Esch House Quilts.  I'm embarrassed to say I haven't read anything else on this blog, but the tree skirt is fantastic!  I should add it to my Google Reader, because I'm sure a lot of other projects are going to pique my interests.

The tree skirt design uses stars and flying geese (as compass points) with a lot of negative space.  While I love the look of gray or white as my negative space, I knew Christmas called for red.  And I won't walk you through all the steps--the tutorial is very well-written--but here are some pictures from my project.

HSTs sewn!  I did all of these in about an hour, while still wearing pajamas.

Laying out the block design.
I wanted to have some fun with each block, and as much as I love red and white (red and white quilts kill me), it's Christmas, and Christmas calls for crazy.  I bought more of the cardinal print from Santa Claus is Coming to Town to accent the stars and compass points.  I placed them randomly throughout the blocks.


Rows are pieced; now I have to lay it out.


Basting.  This is when I close the door to keep all cats out!!
I quilted it simply, and only in the white spaces.  The quilting really didn't matter to me as much, so I used white thread and followed the lines of the stars and points, as you can see below.  Maybe if I could FMQ I'd have quilted trees or stars or something, but I can't.  Someday!

Quilted and "squared up" (not really.)  That mishap near the top left was covered with binding--phew!


On the tree!  I wanted to take pictures in the daylight, because otherwise you can't see the skirt, but of course that means you can't see the lights.  Womp womp.


I am really so pleased with this tree skirt.  My binding, while definitely imperfect--I even watched a Love of Quilting on PBS about binding and still can't get it!--improved on this project, and the colors matched perfectly.  I'm a dummy and didn't get any pictures of the back, but it's backed with the green trees print from Santa Claus is Coming to Town.  I used the green trees in Nick's stocking and the white cardinals in my stocking, tying it all together!  I also used FreeSpirit Solids in red and arctic white.  I love using FreeSpirit Solids (I used Nugray for my Chicopee quilt) because they're a finer weave and don't fray as much as Kona solids.  I'm not paid to say that--I wish I was!--but I truly mean it.  FreeSpirit and Moda Bella are my favorites.

Are you working on any last-minute holiday projects?  I've gotten back into garment sewing recently, but I want to finish my quilts in 2013--and now I have to hold myself accountable, because it's here on this blog!

December 7, 2012

Friday Round-up

Each Friday, one of us does a little round-up of stuff that has stuck in the brain this week.  Kind of like an ear-wig, but with stuff.  Ear-wigs are okay, too.  It's not always sewing related.


screen shot from Kathryn Clark's blog

This week I only have one link for you.  I first found this on Mighty Girl, just a snippet about a particular quilt of a neighbourhood in Cleveland, Ohio (my hometown).

On further investigation of Kathryn Clark's Foreclosure Quilts I found a fascinating geographical project combining the memory and timelessness of quilts and social comment.

Well worth a look.


December 5, 2012

Completion


These were the last stitches of the t-shirt quilt.  It's done.  Done. Done. Done.

I hand-stitched the finishing of the binding and corners.  Mostly because the red bits were a stretch at many points.  There was enough of the white bits to finish by machine, but I wanted a bit more of an even look.

There is something very satisfying about finishing up by hand.  I was very connected to the last stitches.  It became very rhythmic and almost meditative.  It also was a bit tough on the fingers.

There were a few stretches over bulky seams and last minute fixes where layers escaped the initial zigzag stitch, but all in all, I think a success.


Last minute patchwork extensions put in place weeks, months, ago turned out to be almost useless.


As I stitched along, I thought about the process of this quilt.  I thought about the euphoria and serendipity of those first three blocks. I thought about the frustrations of figuring out the back bit.  I thought about how it the materials transformed from articles rich in memories to pieces of fabric to be manipulated.  From the obsessive mania of those days when I sewed for 10 hours to the days when I forced myself to finish.

It's been quite a journey of improvisation and learning.  Finding pieces to fit where needed, working with what is on hand. I admit I am nervous to move on to something with a more defined pattern and planning.  Maybe I will continue with the haphazard method of following my gut and piecing here and there.  I don't know.


I will continue using second-hand materials.  There is something wonderful about using bits which already had a life of use.  I'm sure they present issues in themselves of being wonky cut and never crisply folded or ironed, but I love them.


Yesterday I went to a remnants sale at an upholstery/fabric store and came out with an armful of scraps.

my half of the haul

I split the pile with my neighbour who wants to learn to sew and we will work through a couple of throw pillows and maybe some simple quilting.  Maybe a bit of practice in patterns before starting on the next big project.

December 3, 2012

Love of My Life: My Sewing Room

Do you hear that?  Shh...it sounds like...angels singing.

Yes, ladies and gentlemen, I finally have a sewing room.  I paid my dues in my tiny dining room with the bad lighting, and I was rewarded with a large window, a walk-in closet, and the perfect arrangement for productivity.  I've barely left it in the past few days, working on projects and organizing the crap out of everything in it.

Okay, enough talk...let me take you on a little tour!

The sewing room is the guest room in the front of the house.  It's to the right when you walk in the front door, past the guest bathroom and the laundry closet.  (Yeah, we have a washer and dryer, but I don't want to brag about it.)

View from the door
It's the bigger of the two guest rooms, and though putting a bed and Nick's desk would have been way easier in this room than the other, I don't really care and wanted the better light and more space.

That's how I am.

English major woes.  I actually looked at this yesterday and thought, I don't have that many books, you know.

Magazines in no particular order, because I don't care.


From my former life.  I remember when I used to steal these from school because Barnes and Noble didn't carry them.  Ahh, youth.
The giant bookshelf is the Expedit line from Ikea.  I actually thought I'd have room leftover after I put up my books!  What a joke.  The books aren't in any order, just thrown up there as I took them out of the box.  I know that's very unlike me, but after you've unpacked 75 boxes of crap, you tend to stop caring about details.  Maybe one day I'll organize, but until then, I've resigned myself to never being featured on Apartment Therapy, and I'll just have to find a way to survive.


The closet is huge!  This makes me so happy; I hate rooms with the shallow closets and bi-fold doors, especially in a master bedroom.  This isn't the master, of course, but I'm still against them.  I can never get to the corners!  I digress.  The closet is holding a lot right now: boxes for equipment (like my printer and Mac accessories), batting, unfinished quilt tops, what have you.  Pretty much, if I don't want it to be seen, I stick it in there.

I'd like to get hooks for the door so I have somewhere to hang garments I'm working on, but I haven't been to Marshall's or TJ Maxx to grab some just yet.

Ah yes, the good stuff.


I bought these birch pencils at Homegoods for $5.99!  I may never use them but they look cool.
 I originally had my sewing table from Maryland in here.  As you've probably seen, it was just a tabletop with legs, just like the one holding my computer in the first picture.  Nick needed a computer table and was going to buy the same one, but because I'm such a wonderful fiancee, I told him he could have mine and I'd buy a new one.  A shiny one.  Something fun.  The Expedit workstation.

Honestly, it was such a smart decision, and I don't regret spending the extra money.  I love it!  The tabletop is big enough to hold my machine and my cutting mat at the same time, and sturdy enough that it doesn't shake when I'm sewing.

My notions are stashed in the white container, while my embroidery materials are in the hammered container.


While my mom was in town, we organized my fabric stash by color and size.  All small pieces (yard and less) are folded in the top four cubbies, while apparel fabric and large cuts are below, as are patterns.


I also love my little snap containers!  I keep small patchwork pieces (charms or smaller) in the top bin; the second holds thread and zippers; and the last stores all my finished projects I'm not using, such as embroidered pieces.


Finally, I'm able to keep my computer in here, which is great because I can listen to music or watch movies while sewing!  

Do you like these chairs?  Mom and I found them at Goodwill for $8 each.  Someone had bought one but never picked it up, so when we went back the next morning, I mentioned it to an employee and he sold it to me.  Sorry, suckers!  They're surprisingly comfortable, and such a good deal.

My sewing room certainly isn't complete yet!  I haven't bought any of the art I wanted, and I'd still like a comfy chair for reading or embroidery.  But it's coming along!  I've sewn a tree skirt so far, and worked on a few WIPs.  I love having my own space where I can close the door to keep the cats away, and I'm close enough to Nick's office that we can have a conversation while still doing our own thing.

Next week, I'll show you my tree skirt.  For now, tell me about your sewing space!  Do you have a room or just a small corner?  I want to hear details!