November 30, 2012

Friday Round-Up

Good morning!  Things had been a bit quiet here during our Thanksgiving break, but Ariel's binding and I'm getting slowly back into my groove.  We're all moved in (minus a few box stragglers hanging out) and I'll have a peek into the evolving sewing room next week!

Of course, during the move I didn't stay away from blogs or Pinterest, so here are a few links I've found lately:


  • Camille Roskelley (of Bonnie and Camille) previewed her new line Happy-Go-Lucky on her blog yesterday.  I think we finally have a contender for Swoon!
  • Banana Pudding Sandwiches with Homemade Vanilla Wafers from Eat Live Run sound heavenly.  I may need to make some soon, now that I have some room in my kitchen!
  • These fabric buckets from Ashley at Film in the Fridge are everywhere right now!  I might whip up a few for the sewing room.  Once I get through my other pile of projects!
  • I've been wanting to tackle piping in garments, and this tutorial from Coletterie (of course) seems like it's the perfect helper.  Hopefully I manage to not mess it up!
  • Finally, if I'm going to drink a whole bottle of champagne on New Year's Eve, I should probably do it in style, and with something glittery.
Have a wonderful weekend!  See you on Monday!

November 28, 2012

Binding Lessons

I had so hoped to have a finished quilt to welcome you back from our little Thanksgiving break, but I got sick over Thanksgiving so I didn't get as far as I hoped.


This sad thing waited for me all through the weekend.  It's all squared-up with no where to go.  About the same time I did this, I got the scrap bag back out and realized I still had enough t-shirt left to create some strips for binding.  Initially, I wasn't sure about binding with t-shirts as it is stretchy and may not lend enough support to the thing.  In the end I decided why not go all the way.

This means the only materials I bought for this quilt (beyond necessary quilting tools which will be used over and over) are the wadding and some embroidery floss.  Everything else was reused from my stash.  It's not much, just fabric and thread, but I'm pretty proud of that fact.

Anyway, on to the binding.

I had two white strips left over from the 'back widening' snafu and enough big red blocks and two red sleeves to create two more strips.  The white strips were 2.5 inches and the red 2 inches.  Having not read a binding tutorial yet, I didn't realize this could be a problem.

In fact, when I started, I didn't plan on reading a tutorial   As with the rest of the quilt, I was going to figure it out on my own.

I began 'pinning' the white strips in preparation.


My plan was simply to run a seam down the edge, turn it all over, iron a fold in the remainder of the binding and sew it down.  Luckily I thought this through a bit more before putting needle to fabric.  Have you spotted the problem?

Simply sewing down the back side would leave an obvious seam on the front.  I couldn't for the life of me figure out how to fix that, so I broke down and looked up a tutorial.  Of course, I realize refusing to use tutorials is ridiculous as the whole point of the my side of the blog is to learn from those women willing to pass along their skill and memory and learn myself.  So I humbly typed 'how to bind a quilt' into Google and stumbled upon this one from Red Pepper Quilts.  At first read I didn't understand anything beyond the fact that I had cut my red binding too skinny, I should fold the binding in half first thing, and I really should have a continuous length of binding instead of four separate pieces.  Oh well.  I started with the one thing I could fix and hoped it would all work out.

being lazy and folding while still 'pinned'

finished product

red binding waiting on the banister

I attached the white binding first with a zigzag stitch right along the edge.  In hindsight, leaving a seam allowance would have made it less 'curly.'  The jersey of the t-shirts tended to stretch a bit and so it was more like a surged edging than a seam.


Once the white binding was attached, I ironed it flat and 'pinned' the red.


When sewing the binding, I left the corners free.  I have yet to figure those out.  Again, I have an idea in my head of how it should work, but those ideas haven't worked in reality thus far so I may have to rethink.  Having learned from the white edges, I left a bit of a seam allowance with the red.  Apparently temporarily forgetting the red wasn't wide enough in the first place.

Things were humming along just fine until about six inches from the end of the last edge.


Suddenly the machine gave out.  The thread kept busting, the needle kept hitting the foot and there was a rat's nest of thread to be cut away underneath every time.

I couldn't figure it out.  I tried re-threading about six times.  Same problem every time.  I tried taking the foot off and reattaching.  Same thing.  I tried tightening all the screws, thinking it got jangled in the move.  Same thing.  At one point a very large clump of lint came out with the rat's nest of thread.  At this point I had made enough frustrated noises that Pete came upstairs to check out the problem.  He watched about three attempts and suggested everything I had already done.  After witnessing the lint ball he decided to take off the running board and blow out any remaining lint.

The next attempt worked and I finished the last six inches.


It wasn't until that point that I turned the quilt over to inspect the work that I found the real culprit.


I had left a piece of masking tape on the backing.  Oops!

At the time I probably thought it was a relic of the process and left it to be a marker for a story.  The resulting story of lint and frustration was not expected.

November 19, 2012

Decorating a Sewing Room

Hi!  This is my last post from Maryland--next Monday, I'll be a resident of Charlotte, and will probably be up to my eyeballs in boxes!

We're moving from a one-bedroom apartment to a three-bedroom house, which is enough to make me squee just a little too loudly.  After two years in this rundown suburban box, we'll be able to stretch out a bit and actually have our own spaces!  We'll still be in the suburbs, because our offices are outside uptown Charlotte, but the neighborhood is quiet, there are cows across the street, and we'll be 15 minutes from Publix.  Frankly, that's enough for me.

After freaking out in my Round-Up Friday, I heard that afternoon that we did get the house we wanted, and we can move in next week!  Nick's dad is helping us move, and will be here the night of Thanksgiving to get this going.  Of course, I've been mentally decorating the whole house since we saw it.  I never really settled into our apartment in Maryland, with its mirrored walls and scratched floors.  We decided pretty early on that we didn't like it, but due to a small budget and inconvenient commutes, we couldn't leave.  I never hung up pictures or even put our name in the apartment mailbox.  We also don't know our neighbors, but I think that's a D.C. thing more than our issues.

This move to Charlotte has been long-coming and there's so much good coming with and from it that it's hard not to be overly excited and want to settle immediately.  I just want it to be my home!  We'd like to buy in a few years, but until then, we want to fully embrace this little split-floorplan home as our own.

So, naturally, you can see my brain planning the sewing room.  I already know the front guestroom, with the large window, will be my space for my sewing and office things.  It's not a huge room, but it's plenty big enough, especially considering my sewing room shares my dining room and my office is my bedroom in this apartment.  I'm so excited to have some room!

I've been scouring the internet (mostly Etsy and Ikea) to find some contenders.

Wall decor

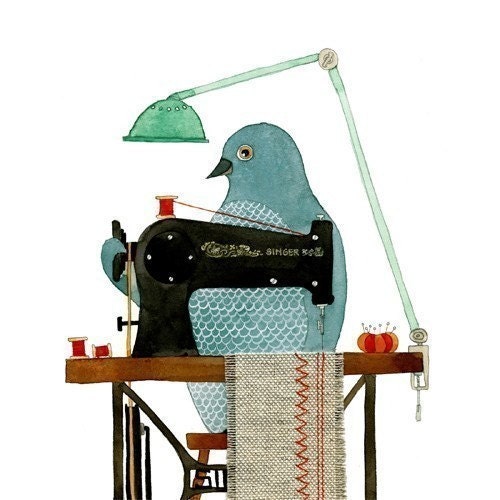
Crafty Bird by Geninne, $30
I've loved this bird forever!  I originally wanted to buy it for my mom, but I think it'd look great above my machine.  Something to smile at while I'm ripping out stitches!

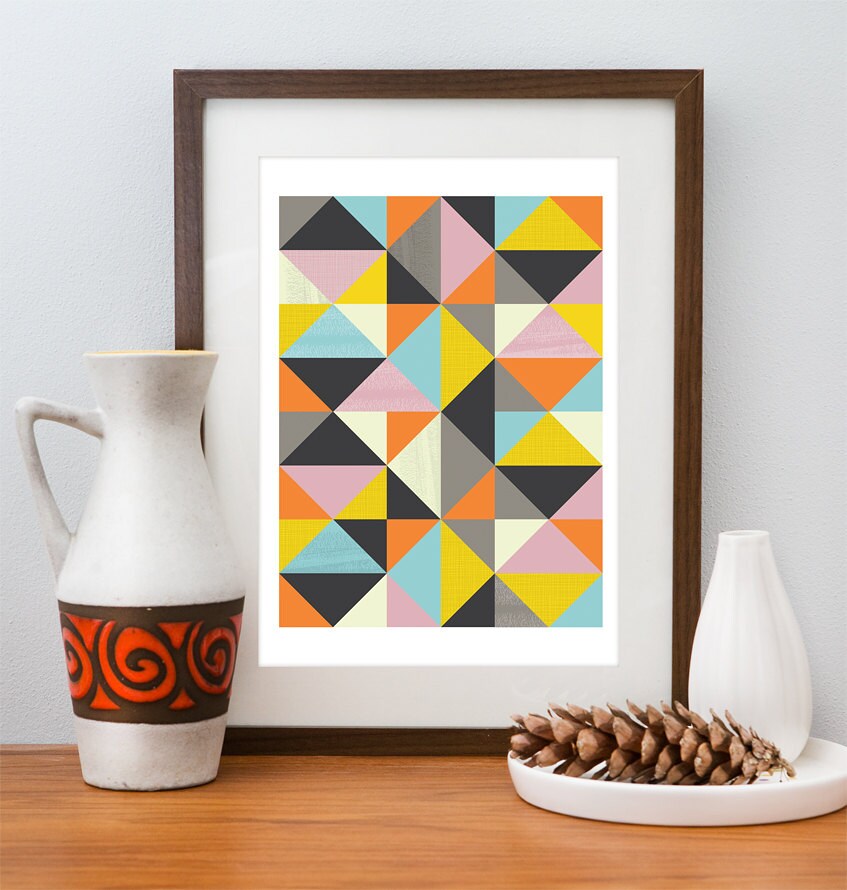
Geometric print, $19
Flying geese, HSTs--looks like a quilt to me!

Snow & Graham calendar, $29.95
I am a calendar freak.  I have another one picked out for the kitchen and I'm sure I'll need one for my new office at work!  This one is so girly I can get away with having it in my sewing room without hearing Nick complain.

Full Bobbin print, $20
I pinned this and Ariel immediately said, "Perfect for your sewing room."  Girl, I know!  I love the message and the design.  The colors lead me to...


Patty Sloniger's new line, Les Amis, has two colorways, and I think the "boy" colors would look great in a sewing room, showcased in embroidery hoops or stretched over canvas squares.  You can see the whole line here at Hawthorne Threads.  I'd also like to showcase some of my embroidery in hoops!

Furniture
Currently, I use the same desks from Ikea for my computer and my sewing machine.  The only difference is one has red legs and the other has white.  I plan on keeping them (unless I can find a cheap architect's desk...), because they're basic and still in good shape!

Ikea Ektorp Jennylund, $249
I would like to have a comfy chair to sit in the corner of the room!  This space will also have all my books/bookcases, so a little reading nook is ideal.  I also tend to hand-stitch, or hand-rip, and having somewhere to sit with natural light is essential.

Ikea Ektorp Bromma, $149
Ariel also saw this and knew exactly what I'd do with it: quilt storage!  The top on this ottoman lifts up for storage, which is absolutely necessary in a sewing space.  I could put extra fabric, finished quilts, or even books in there!  I'm a huge fan of ottomans and think they provide great seating and support.

Carson bookcase, $89.99
One great thing about this house is the closets are huge in every room, not just the master.  I'm going to use the closet for fabric storage, so I can close the door and keep fabrics from sunlight and fading!  This bookcase would fit in the closet and keep everything organized.

Miscellaneous
Emerson Shelby rug, $142.99
The rooms are carpeted, which isn't ideal, but it's a rental so I can't do anything about it!  I still think it'd be nice to have a fun area rug to ground the room--the blues and greens would coordinate with the wall decor, and the red and yellow would add some interest and versatility.

Bernina 830, $12,999
Ahh, nothing like a new sewing machine...wait, I don't have an extra $13,000 laying around?  Time to save up!

What do you think?  Am I missing anything essential?  I'm new to this sewing room business, so any suggestions are welcome!


November 16, 2012

Friday Round-Up

Things are getting pretty empty around here!  I'm out of work until I start my new job in Charlotte, so I've been a packing fiend lately.  All that's left are the bedroom and the kitchen.  However, we still don't have a final word on our lease from the property management company, so it's making it awfully hard to plan something like moving without an end destination.  In fact, it may be giving me an ulcer!


So let's focus on the happy things instead, okay?


  • This folk star throw from All Buttoned Up is exactly what I want to make: something with intricate details and a wonderful fabric selection, which I can also look to and think that it's so deliciously me without compromises.  It's also slightly Christmas-y and I can't pass that up.
  • I love Craftyblossom's simple, modern quilts, and this red cross baby quilt is no different.  Modern crosses and gray background?  Be still my heart.  I would make more baby quilts, if only there were more babies in my life!
  • Did you forget I'm engaged?  Because I totally did!  If I didn't have to slip a ring on my finger each day, that tiny little detail would be lost in the move by now.  Anyway, even though we aren't having a wedding, these honeycomb die-cut invitations from Southern Weddings magazine are feminine and modern without being too saccharine-sweet.
  • Stichery Dickory Dock is doing a block-of-the-month next year, and I'm contemplating: do I join?  Do I not?  Decisions, decisions!
  • I'm having tons of fun decorating my new house (if it ends up being mine...make a decision!!) over on Pinterest.  Go judge me by my furniture decisions.  
Cross your fingers for us, y'all--we need it!

November 14, 2012

Fit to be tied

I can finally leave the back of this quilt and return to the heart of the project.  The front has the stories and I was anxious to get back to it.  I almost forgot what it looked like.

I never intended to properly quilt this side.  The 'quilting' part of this project was more patchwork than texture.  However, having got my hands dirty with the back section, I feel okay about leaving this side a little bare.  I do however need to find a way to attach it to the wadding and the back section.

I settled on tying.  In my head this meant creating little bows at junctures. In reality it was a pain and very fiddly.  My fingers still ache a bit from the tiny work.  The quilts I referred to (in my head) for this step always used yarn for the bows.  It's a bit more substantial and cozy, but it also eventually turns into natty lumps.  I also didn't have any around.

I went with embroidery floss again.  I may live to regret this decision, as it isn't very substantial at all, but it was what I had on hand and I was feeling comfortable after all that hand quilting.

First I had to layer the pieces together.  The back is fairly sturdy as is, so I just smoothed it out and rolled the top out while praying it all was generally the same size.  After my issues with the back sizing I had a brief panic about it all being too big or small.

Turns out it is almost perfect.


All that worrying and it turned out just as it was meant to.  It's almost as if I actually know what I'm doing and not just making it up.

Once the top bit was squared up to the bottom bit, I started pinning it together.  I tend to work from one edge and then sweep along (right to left, left to right) working my way to the opposite edge, always smoothing out as I work.  The issue I have with tying is that the back and front are in no way in conversation and so any marks on wither side will stand out on the opposite side.  In order to make the tying a bit easier, I pinned at each juncture I wanted a bow.  This gave me stability in the fabric, but also a guide on the back to see if any points just happened to match up and I could go through all layers.

I'll save you the suspense, none matched up.


Because none of the front junctures were anywhere close to any of the back junctures the tying portion of this game was going to be tricky.  I had to catch the top and the wadding in the bow, but leave the back to its own devises.  With all the hand quilting, the back is quite secure with the wadding.  I'm just hoping the multitude of ties on the front will keep the front secure to the wadding as well.

With nothing left to do but start, I boldly heading into unknown territory and starting experimenting with some bows.  I start with a needle and floss, make an initial stitch (leaving a very long tail) and then double that stitch so it is as secure as possible.  Next I simply tie a bow, as if I was tying my shoes, and double knot it.

Done.


Inevitably, the first one didn't grab enough layers but the rest turned out fine, in terms of layer catchment.  The bows are a bit anemic, but I think it will do.

When I got to the end, I realized the scattering of knots may not be enough to hold everything in place until the binding goes on, so I worked my way around the edge, tacking each juncture through all three layers.


And so it's done.  Or at least one step away from done.  Now all that's left is binding.

I say that like it's a simple thing of just whipping it through a machine and TA-DA! QUILT DONE!  I have no idea how to go about binding this sucker.  I may have to break down and read a tutorial or something.

I have to admit the tying treatment didn't turn out how I imagined, but it will have to do.  I'm ready to be done with this particular project.  This quilt has been with me for four months.  The first stages are the most exciting and exasperating in equal measure.  The piecing, patchwork and watching it take shape is exhilarating and full of memory.  These final bits of sandwiching and quilting and binding feel a bit like administrative paperwork.  No wonder so many quilts go unfinished.  Despite the paperwork-aspect, the stories of unfinished quilts would be interesting tales nonetheless.


However, the year is coming to a close and it is time to tie up loose ends and get sorted for the new year.


What projects are you putting off?
How much would it take to finish them and start the new year afresh?


Tell us your paperwork-quilting stories...

November 13, 2012

Moving While Sewing

So...I'm late.  This weekend was a whirlwind of crazy activities--house-hunting included--and I woke up yesterday only to realize I never scheduled a post.  Being a strict rule-follower, I felt awful and immediately apologized to Ariel.  We drove home yesterday and I figured I'd write a new post today.

So we are moving, and I am not sewing.  What should I talk about?  I haven't even lifted the cover off of my sewing machine in two weeks, and I'll only use it this week to repair one of Nick's shirts (why do his sleeves rip all the time?  Why?).  Because things will be pretty quiet around here for a while, I decided to write about moving, and how I'm figuring out this process.

I've moved a lot.  This will be my eighth move in 25 years.  Packing, getting movers, looking for a new house--these are all old hat to me.  They're no less stressful, but they're familiar and I can call on my family for advice, should I need it, as they've moved even more.  However, this time, I have a sewing machine and a lot of fabric to move.  While I've always had books to move, and have considered them my hobby, sewing has become my true hobby, and I don't want to spend too much time away from the machine.

Here are some steps I've taken:

Pack fabric in plastic containers
For whatever reason, it just made sense to me to pack all my fabric together, so I wouldn't lose a box, and in something I can use as storage later.  I went to Target and bought a huge (66 quart?  20 gallon?  I have no idea--big) Rubbermaid storage container with a locking lid.

I stacked fabric inside with scraps on top, so the scraps would have to be dealt with first.  Even if I do end up throwing scraps back in here, I will at least have to go through everything before throwing in the towel.  I'll know where everything is and can take inventory as I'm unpacking.


Pack like items together.
This makes sense to most people, but some need a reminder.  All my patterns are in one box.  All WIPs--such as those quilt tops I suddenly don't have time for!--are in another.  My batting will probably go without a box, but will need to stay together.  I label everything and make sure nothing gets thrown into a kitchen or bedroom box.  Once I'm in my sewing room everything will be a thousand times easier to unpack as well.

Take your machine with you.
I don't know about you, but my sewing machine is my most valued appliance, after my KitchenAid mixer.  While the mixer will get a ride in the truck, my sewing machine will sit on the floor of my car behind my seat (next to my iMac, I'm guessing).  While my mother has always packed her machines and never had a problem, something just feels wrong about letting it go.  It's a very expensive machine.  I don't have the cash to replace it right away.  I'd rather have it, and its cover and accessories, safe in my Yaris than being squished under our couch or something.  Plus, once I sit it in our front guest room, that means the space is mine!

Our boxes will arrive today, and my last day of work is tomorrow, so I have a lot of work to do!  I plan on doing a Friday Round-up, but things might be a little quiet from me in the next week as I get settled in a new house and a new city and state!  However, I have some exciting things planned for the holidays and the new year, so you'll hear from me again soon!


November 9, 2012

Friday Round-up

Each Friday, one of us does a little round-up of stuff that has stuck in the brain this week.  Kind of like an ear-wig, but with stuff.  Ear-wigs are okay, too.  It's not always sewing related.


From Cluck Cluck Sew
As luck would have it, I have had a bit of an ear-wig going this week.  'Let's go fly a kite' is circling my brain and I can't for the life of me figure out why.  So when this little quilt pattern popped up I knew I had to include it this week.  So simple.  I love it.  I've been thinking a lot about my next project and while it will still be made of re-purposed clothing, I was thinking of going a bit more traditional in terms of pattern.  This might be just the ticket.


photo by me
This monkey is my life long companion.  He watched me come into this world and I wouldn't doubt that he will be around when I go out.  He is well-travelled and well-loved.  He currently serves as the old wise man among our small stuffed toy collection.  It is tradition in our family to buy any new baby a sock monkey.  For awhile they were very hard to find.  Recently they have had a bit of a resurgence and while they are more readily available now, I have a bee in my bonnet to make my own.  But where to get the socks?  This is where the internet comes in handy.  Here and are the socks and you can also buy a sock monkey pattern.


Chipmunk here, Tattooed man here
Speaking of making stuffed toys...I found this particular pin board through A Printable Press.  How cool are these?  The chipmunk is just too cute (and resourceful.  I predict a lot of lost gloves and mittens in my future).  But the tattooed man?  That is right up my (clown) alley.  I'm all for circus themed toys and an Edwardian Tattooed Man?  That's classy.


Plum Alley Wallpaper from here
Which leads me to some pretty awesome wallpaper.  Elephants (of all sizes) on parade.  This just has 'me' written all over it.  Too bad it's $170 a roll before international shipping.  A girl can dream.


That's it from me.  Until next week...

November 7, 2012

RESULT!!

So here it is.  The legend... (wait for it) ...dary hand quilting. 


There are definitely some wonky bits.  I also had to pull out two lines of stitching because I got my gradient (or ombre) scheme wrong.  Those Waltons were drawing my focus.  


The visual interest is upped and the florescent bits are toned down a bit.  Always a good thing.  It still isn't my favourite part of the quilt but I'm not as annoyed either. 

Time to sandwich and figure out what to do with the front bit.  More quilting? Or tying? I'm leaning toward tying.  

We're getting close to the end of this project, folks.  Emily whipped through a bazillion and here I am toiling away on this one little odd shaped quilt.  I told you this was going to be a long ride. 

Have no fear, the next project will be just as drawn out, I'm sure.  I wouldn't want to break with tradition. 

November 5, 2012

My First Hand-Quilting Experience

Two weeks ago Ariel and I both mentioned hand-quilting, without any prior conversation.  This is why we have this blog: sometimes we share a brain over two continents.  Freaky.

While I was home due to Hurricane Sandy last week, I started my hand-quilting adventure.  Please note that I did this without following a tutorial or taking a class, so I'm sure what I'm doing is wrong.  Please also don't hold that against me.  I promise I try to follow the rules and am a nice person overall.


I sandwiched and basted the mini quilt as I would have done for machine quilting.  I also grabbed a large hoop (I think it was 12", but it may have been 16") and tried to get that set up.  Well, that took forever, and once it was secure in the hoop, I found that really got in my way more than anything.  Off that went.  Above, you can see the quilt squared up after stitching.


I used DMC embroidery floss, all six strands, for my quilting.  I didn't draw lines or use a ruler; I just kind of went with it while I sat on the couch.  The floss was a pain to get through the needle, so I need to buy beeswax before I ever attempt this again.

All four leaves, all four colors of floss


I backed the quilt with some Lotta Jansdotter I previously used for a blouse.  I love the outline of the leaves on the back.


Unfortunately, I had a smidge of backing that wasn't big enough after I squared up, and even after basting, you could see my batting.  I decided to stick one of my tags over it and call it a day.

I bound with some other Lotta Jansdotter I've used for a blouse.  I have realized I'm terrible at binding.  I don't know why, but I don't get it.  My corners aren't mitered, my ends are a mess, and the stitches aren't straight.  I'm someone who learns by doing, so I'm hoping once I get settled in Charlotte I can take a class somewhere.

Oh, that's right!  We're moving to Charlotte by the end of the month.  Nick and I are starting new jobs in the Queen City.  They do have a few fabric stores in the area, as well as a large Modern Quilt Guild (whom I've already contacted, woohoo!), so I'm excited to get involved in the movement down there.  Maybe someone can teach me binding then!

Have you hand-quilted?  I will say, I didn't hate the process.  I thought I would, because I hate hand-sewing, but I found it a bit meditative and fun.  It got a little clunky holding the quilt in some angles, but I think that's why more serious quilters have a standing hoop.  I won't rule it out in the future, that's for sure.

November 2, 2012

Friday Round-Up


Happy Friday, everyone!  We made it!  It was a tough week here on the east coast, but it's Friday, and we're moving along.  Thankfully, D.C. wasn't hit nearly as hard as New York and New Jersey, but it was scary nonetheless!

I have some big news to share next week, but in the meantime, here are some great things I saw this week!

  • Cluck Cluck Sew has a new pattern out!  Scout premiered at Quilt Market and is right in line with all the feather-inspired quilts and fabrics lately.  
  • I'm falling in love with wonky stars more and more every day, and this block from Elizabeth Hartman doesn't help things!
  • For us garment sewers, it doesn't get much better than Anna's Belladone dress.
  • I've falling in love with Sarah Watt's new line for Blend, Timber and Leaf.  I see some blouses and dresses in my future!
  • And seriously, it's freezing, so I doubt I'm the only one with a permanent burnt tongue from lots of hot chocolate lately.  Brr!
Stay safe this weekend, everyone!  See you back here Monday.